CentOS 7 system installation and configuration graphic tutorial
Operating system: CentOS 7.3
**Remarks: **
The CentOS 7.x series has only 64-bit systems, not 32-bits. The production server recommends installing CentOS-7-x86_64-Minimal-1611.iso version
1. Install CentOS 7.3
After successfully booting the system, the following interface will appear
Interface description:
Install CentOS 7 #Install CentOS 7
Test this media & install CentOS 7 #Test the installation file and install CentOS 7
Troubleshooting #Repair the fault

Choose Install CentOS Linux7 here, install CentOS 7, press Enter to enter the following interface
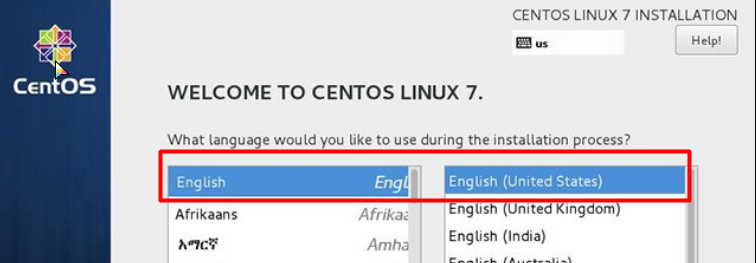
Language selection interface, the official production server is recommended to install the English version.
Continue
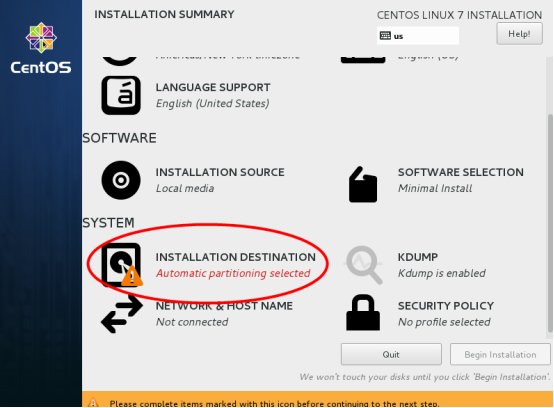
Select-SYSTEM-INSTALLTION DESTINATION, enter the disk partition interface

Select-Other Storage Options-Partition Partitoning-I will configure partitioning,
Click "Done" in the upper left corner to enter the interface below
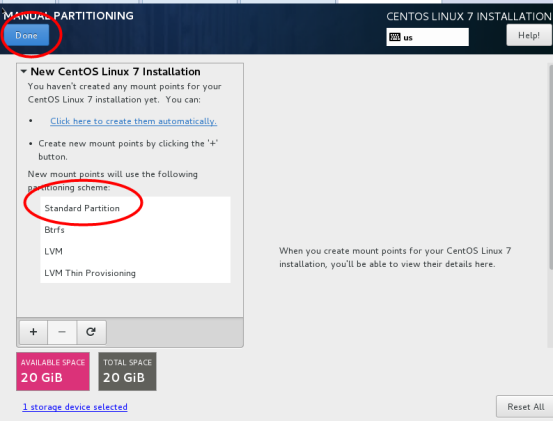
The new mount point uses the following partitioning scheme: Standard Partition
Done
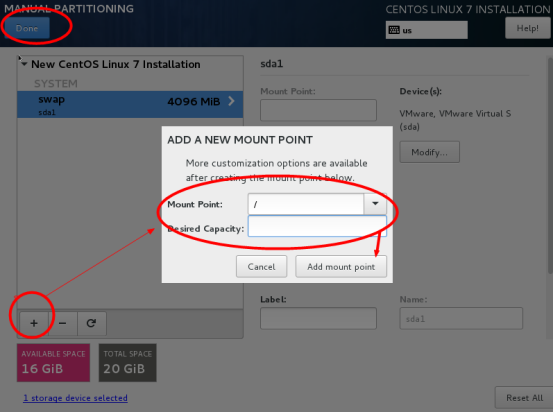
Plan before partitioning, swap #swap partition, generally set to 2 times the memory, / # remaining space
Note: The production server is recommended to be divided into a separate /data partition to store data

Click the "+" sign in the lower left corner, mount point: swap, expected capacity: 4096, add a mount point, as shown in the figure below, continue to click the "+" sign in the lower left corner, mount point: "/" expected capacity:留空#The default is all remaining space, add mount point, as shown in the figure below
Click "Done" in the upper left corner to enter the interface below
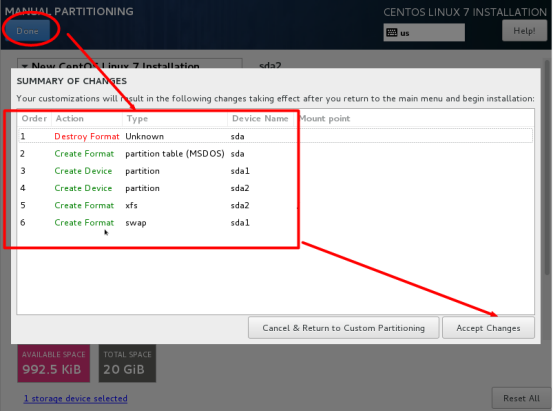
Accept the changes Accept Changes, enter the following interface

Software SOFTWARE"-"Software selection SOFTWARE SELECTION", we use the Minimal version, the default is the minimal installation.
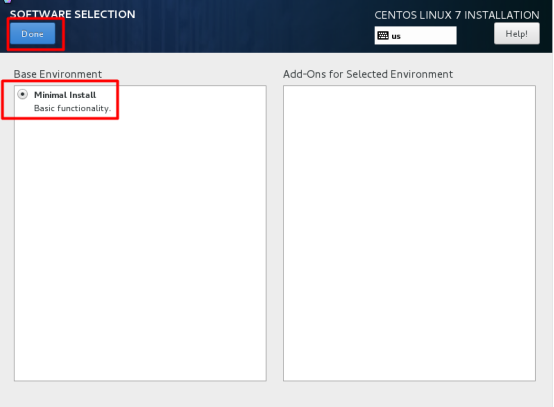
After setting, click Done
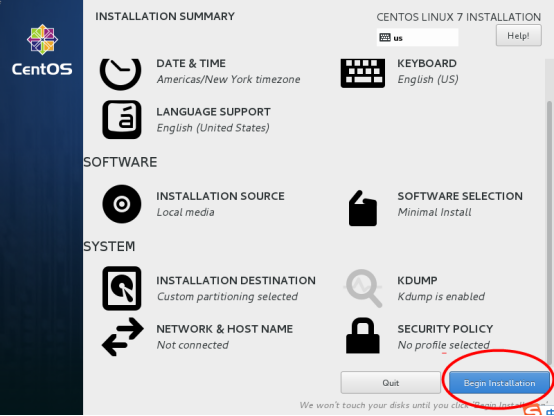
Begin installation
Enter the interface below
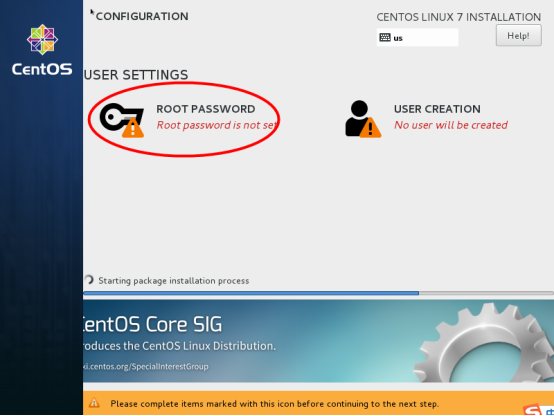
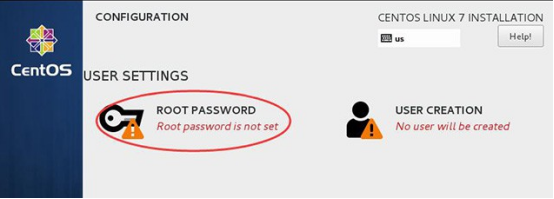
Select-user settings USER SETTINGS-ROOT password, enter the following interface
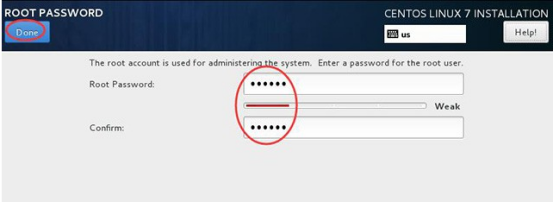
Set Root password
If the password length is less than 5 digits, you will be prompted to press "Finish" twice to confirm, and the installation will continue. After the installation is complete, you will enter the following interface.
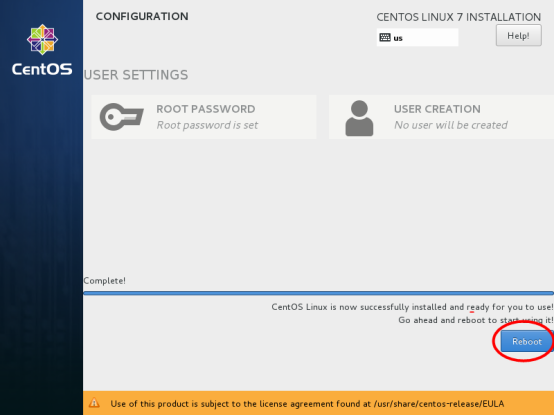
Reboot

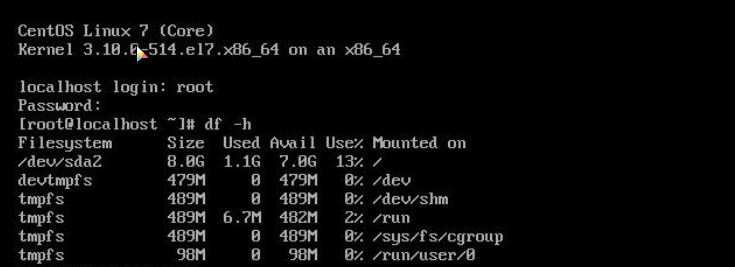
Enter the login interface, enter the user name [root] and password [itnihao], the system login is successful
2. Set IP address and gateway DNS
Note: After CentOS 7.x is installed by default, the network connection is not automatically turned on, so we need to configure it ourselves.
Enter #vi /etc/sysconfig/network-scripts/ifcfg-ens33 on the command line #Edit the configuration file, add modifications or add the following content.
BOOTPROTO=static#Enable static IP address
ONBOOT=yes #Turn on automatic network connection
IPADDR=192.168.1.73 #Set the gateway
GATEWAY=192.168.1.1
NETMASK=255.255.255.0
DNS1=114.114.114.114
DNS2=8.8.8.8
: wq! #Save and exit

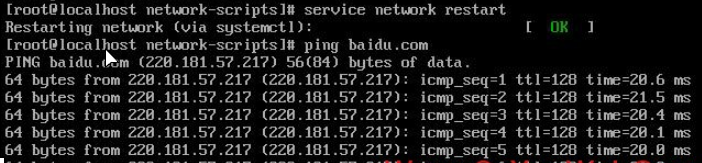
service network restart #Restart the network
ping www.baidu.com #Test whether the network is normal
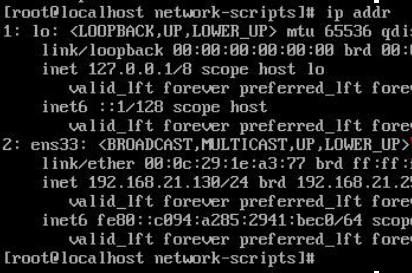
ip addr #View IP address
** At this point, the CentOS 7.3.1611 system installation and configuration graphic tutorial is complete! **
Three: additional
** 1、 Modify host name**
hostnamectl set-hostname compute1
2. Modify network card name###
The network card naming rules in CentOS 7.x system have been redefined. It may be "ifcfg-ens33", etc. Next, we will change the network card to ifcfg-eth0.
1、 cd /etc/sysconfig/network-scripts/
mv ifcfg-ens33 ifcfg-eth0 #Modify name
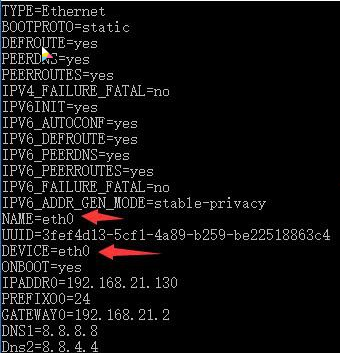
vi ifcfg-eth0 #Edit
NAME=eth0 #modify
DEVICE=eth0 #modify
:wq! #Save and exit
- vi /etc/sysconfig/grub #Edit
Add a sentence "net.ifnames=0 biosdevname=0" to the "GRUB_CMDLINE_LINUX" variable
:wq! #Save and exit
-
Run the command: grub2-mkconfig -o /boot/grub2/grub.cfg #Regenerate the grub configuration and update the kernel parameters
-
Add udev rules
Create a network card rule "70-persistent-net.rules" in the "/etc/udev/rules.d" directory, and write the following statement:
SUBSYSTEM=="net",ACTION=="add",DRIVERS=="?",ATTR{address}=="00:0c:29:1e:a3:77",ATTR{type}=="1" ,KERNEL=="eth",NAME="eth0"
#ATTR{address}=="00:0c:29:1e:a3:77" is the MAC address of the network card
cd /etc/udev/rules.d
vi 70-persistent-net.rules #add
SUBSYSTEM=="net",ACTION=="add",DRIVERS=="?",ATTR{address}=="00:0c:29:1e:a3:77",ATTR{type}=="1" ,KERNEL=="eth",NAME="eth0"
:wq! #Save and exit

shutdown -r now #Restart the system
The network card has been changed to eth0
Recommended Posts